This is a DIY guide on how to fix a toilet that is refilling too slowly.
A few months ago, I moved into a new house, only to discover that all of the three toilets were taking 5-10 minutes to fill back up.
It was one of those minor annoyances that I kind of just accepted at the time. And I’m guessing that the previous owners did too.
Then, one day—just like you—I grew tired of it and decided that I was going to fix it.
The toilet fill valve controls the water supply to your toilet cistern.
A toilet fill valve is a mechanism that is located inside the toilet cistern. This “mechanism” essentially controls the water supply to your toilet.
When a toilet is flushed, this valve will begin to pump water back into the cistern.
As the water fills back up, the floater ball in your toilet will rise with it. Once the water has reached a certain level, the lift arm that is attached to the ball will push in on the valve and restrict the water supply.
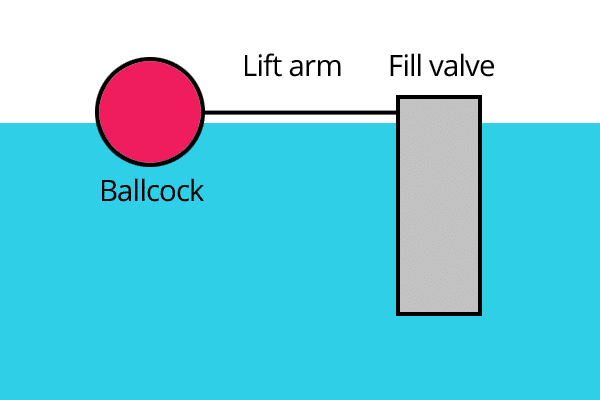
A simplistic diagram showing the ball, lift arm and fill valve in a toilet cistern.
In my case, the black diaphragm washer inside the fill valve had become worn. After years and years of the lift arm pressing in on it, the diaphragm washer had become bent out of shape.
This meant that the washer was constantly pushing in on the fill valve, even when the toilet cistern was empty. As a result, the fill valve would only let out a small trickle of water at any given time and the cistern would take ages to refill.
Note that this issue occurred in all three of my toilets. i.e. I had to replace three washers. This tells me that it is a fairly common problem and that there is a good chance that it is causing your refilling issue as well.
This is the diaphragm washer that I purchased for €2 at a local hardware store:

Step 1. Restrict the water supply to the toilet cistern.
Before you unscrew anything, you should always turn off the water supply to the cistern. This is the first step in almost every plumbing-related job. Always restrict the water supply. The last thing you want is for water to start gushing everywhere.
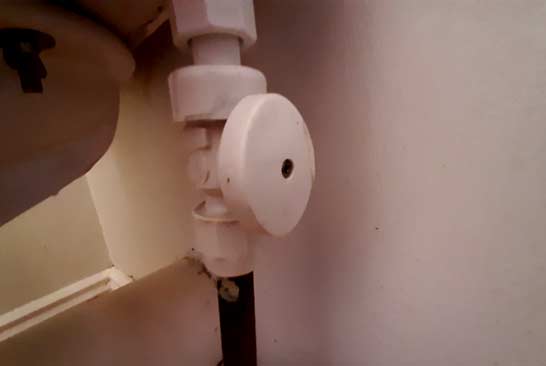
On most toilets, there will be a small shut-off valve on the pipe leading up into the cistern.
This supply valve will be located somewhere at the side of the toilet:
A water supply valve. This can be used to restrict the water supply to the cistern.
In some cases, your toilet will not have a supply valve. If that is the case, then you will need to turn off the entire water supply while you carry out the job.
In Ireland, a lot of houses have an upstairs hot press storage room. Inside this hot press, there is usually a valve that you can use to turn off the water supply:
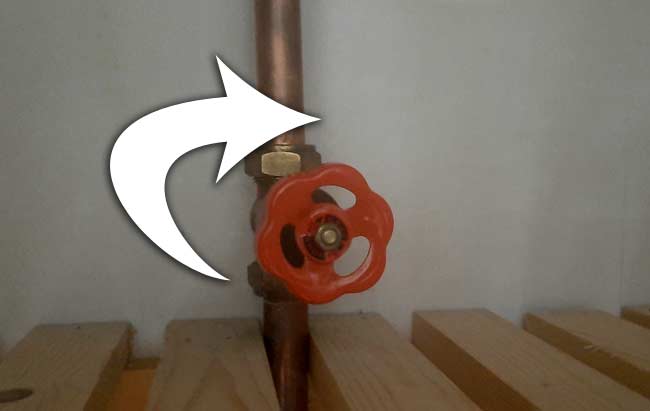
Remember: Righty tighty, lefty loosy. Turn the valve to the right to tighten it and restrict the water supply.
Note that you should leave a faucet / tap in your bathroom running while you restrict the water supply. When you can no longer hear the tap running, then you know that the water has been shut off.
Step 2. Remove the toilet cistern lid.
Your toilet cistern will have a heavy lid on top of it:

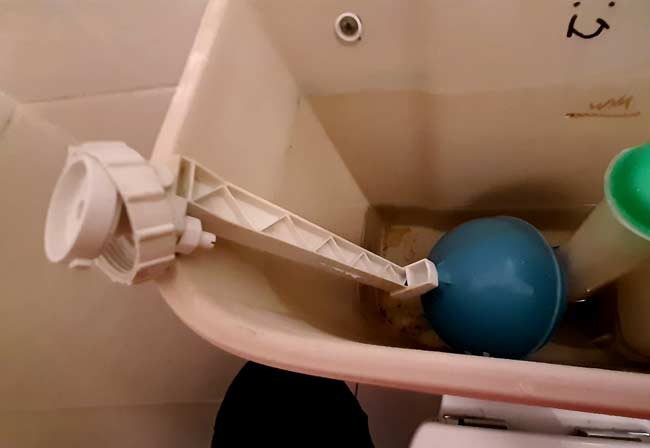
Take the lid off and place it carefully on the floor. Once you do this, you will be able to see inside the cistern:
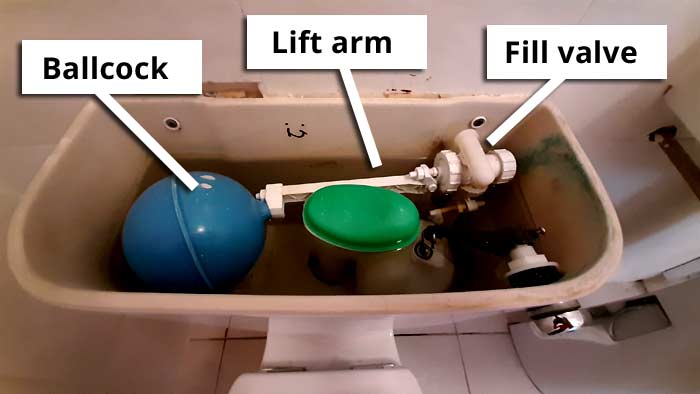
A photograph showing the inside of a toilet cistern. I have labelled the ball, lift arm and fill valve.
Note that your cistern will probably be slightly different. Your ball may be a different color and you’ll probably have a different Fill Valve. However, all in all, most toilets tend to function the same way.
If you look closely at where the Lift Arm meets the Fill Valve, you will see that there is a small button mechanism:

When the water fills up and the ball floats up, it will force the Lift Arm to press in on this button mechanism. This button then pushes in on the diaphragm washer, which restricts water coming into the cistern.
Step 3. Flush the toilet.
Now, let’s get rid of the water that is currently in our cistern by flushing the toilet. If you successfully restricted the water supply in Step 1, then the cistern should not fill back up after you flush it.
Once the water has receded, you will notice that the lever at the end of the Lift Arm has pulled away from the Fill Valve:

As you can see, the lever is no longer pressing on the button mechanism in the Fill Valve. In normal circumstances, this would take the pressure off the valve and allow it to refill the cistern with water.
Tip: Before you go any further, take a photograph of what your Fill Valve looks like. In fact, take pictures of everything as you go along. Photographs may help you when the time comes to assemble everything back together.
Step 4. Unscrew the lock nut.
In my cistern, I have a plastic lock nut that connects the Fill Valve to the Lift Arm. Yours will probably have something similar:

Make sure that you unscrew this lock nut slowly and carefully. You do not want the washer or the button to fall into the cistern.
Note that in some cases, this lock nut will be too tight to unscrew by hand. If that is the case, then you will need to use a wrench or a vice grip to loosen it. Remember that in order to unscrew this lock nut, you will need to rotate it to the left.
You’d be surprised how many times people end up tightening it even further by mistake.
Step 5. Remove the Lift Arm from the Fill Valve while being careful not to lose any small pieces.
Be extremely careful while removing the Lift Arm, as there is usually a small white button inside of it:

Take this small button out and put it somewhere safe so that you don’t lose it. Without this button, the fill valve will not be able to cut off the water supply:

Once you’ve made sure that any loose pieces are safe and sound, you can place the ball and Lift Arm over to the left, out of your way:
The ball and Lift Arm after being removed.
Step 6. Remove the old diaphragm washer.
Inside the Fill Valve, you should see a rubber diaphragm washer. In my case, the washer in question was black:

You can remove this washer by using a flat-head screwdriver or by using your fingers. If a dribble of water comes out after you remove it, do not be alarmed. It’s just a bit of excess water that got trapped.
Here is a side-by-side comparison of the new diaphragm washer that I purchased and the old worn washer that I removed from my toilet Fill Valve:
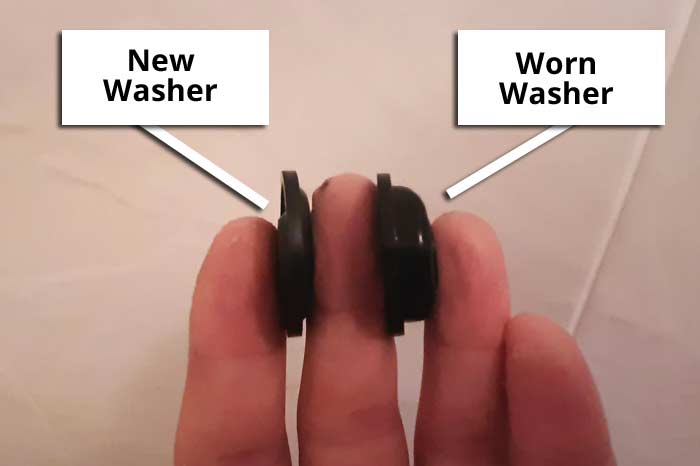
The worn diaphragm on the right is the reason why my toilet was refilling slowly. To fix this issue, I had to replace it with the new washer on the left.
As you can see in the photograph above, the washer on the right has a “bulge” in it. Over the years, the Lift Arm has worn it and pushed it further and further into the valve.
As the washer became more worn and out-of-shape, it restricted the water supply and caused the toilet to refill slowly. Had I not replaced it, it would have gotten worse and shut off the toilet’s resupply of water altogether.
After the washer has been removed, you should be able to see the valve that it presses in on when the water has risen. In my case, this valve was red:

Because my worn washer was always pushing in on the red valve above, it was unable to pump out a healthy stream of water into the cistern.
Instead, it was only able to let out a trickle of water. This is why the toilet was refilling so slowly.
Step 7. Put the new diaphragm washer into the fill valve.
Now is the time to put the new washer in and re-attach the Lift Arm. Here is a photograph that I took after I put the new washer in:

Then, reattach the Lift Arm and make sure that the button mechanism you took out earlier has been put back into its place. While holding the Lift Arm in place, tighten the nut lock back on:

As you can see in the photograph above, I reattached the Lift Arm to the Fill Valve and tightened the nut lock back on. You’ll also notice that I turned my water supply back on and that it filled up as far as the “WM” mark inside my cistern.
The “WM” in this case means “Water Mark”. Having a cistern that fills up too far past its recommended water mark can cost you money over the years in utility bills.
Here is a video of the Fill Valve pumping out water with the new washer inside:
This is far better than the trickle that was coming out before!
Getting the cistern to refill to the water mark line can take a few flushes to get right. At the end of my Lift Arm, there was a small nut and screw. By tightening this screw, I was able to cut off the water supply sooner and lower the water mark line.
Loosening it has the opposite effect, allowing the water to fill up further:

If you play around with loosening and tightening the screw above, you will eventually get a refill that you are happy with.
I hope this guide helped you to get your toilet refilling normally again!